


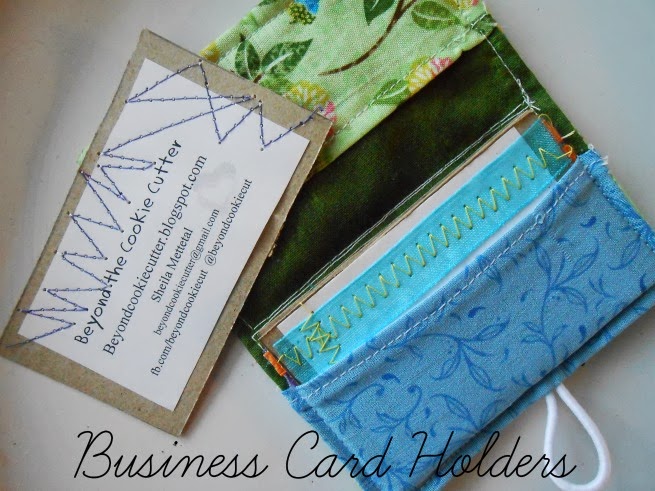
I found this wonderful tutorial to sew business card holders, which seemed like the perfect thing to make as I prepare to start my first big girl job this week. I changed mine from the original ever so slightly; Melanie from The Crafty Cupboard made a super helpful and thorough tutorial that you should definitely check out if you plan to make one. Ready to make your own?

You Will Need:
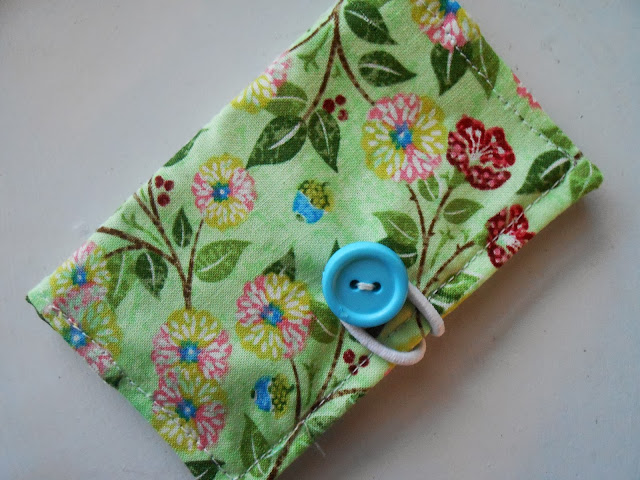
2 pieces of fabric 5-1/2” X 4-1/2”, one for the cover and one for liner
2 fabric pieces cut 2-1/2” X 4-1/2”
small hair tie
small button
sewing machine, or needle, thread, and perseverance
Mod Podge or thin cardboard (optional)
Mod Podge or thin cardboard (optional)

Start by sewing a double hem on one 4-1/2" side of each of the 2-1/2" X 4-1/2" pieces. Pin the 2 smaller pieces to the front of one 5-1/2" X 4-1/2" pieces. The hemmed sides should go towards the center. The larger piece used here will becoming the lining. You can use the same fabric for all of them, or whatever combination you'd like. Baste stitch around as close to the edges as you can (the original tutorial recommends 1/8" seam allowance) to tack the pockets onto the lining. You could skip this step, but I feel like it makes them a lot easier to work with.

Pin the other 5-1/2" X 4-1/2" piece that will be your outside cover, right side towards the stitched pockets. In the center of one 4-1/2" edge, feed the hair tie through. Leave about a third of the tie outside of the fabric; the part you just fed through will become the button hole.


It's a fun gift and a good way to use up scraps as well. I may have gotten a little carried away. Each one took less than an hour.

As soon as I press "publish," I'm getting in the car and heading out to start the moving process! Here's to the eight hour drive ahead *raises coffee in a toast-like gesture* Can't believe it's already time to say goodbye to my family again and hello to this next chapter of life.
Do you use business cards? What do you keep them in? Any fun suggestions? I'd love to know!
Sheila
P.S. Happy first day of school for so many! My Mom's kindergarten class starts today. I'm not sure if the kids could possibly be any more excited than she is.
No comments:
Post a Comment
Hi there! Thanks so much for stopping by. Please feel free to leave a comment with your thoughts or subscribe using the buttons on the top right so we can get together again soon. Thanks friend!