


My friend Nicole and I served as VISTAs together in Montana 2 years ago. Since then, we both moved on to new professions in new areas but it's still fun to support each other whenever the opportunity arises. When she first started her current job, she decided to fancy up the mandatory I.D. badge with a project I'm sure many people could use. She was kind enough to share her process:
For this project I started with some basic tools.
Needle Nose Pliers with a side cutter
Beadalon bead stringing wire in satin silver and .46mm
Beadalon crimp beads size #1 in silver
Beadalon swivel badge clip
Barrel clasp in silver (not pictured)

(Beadalon did not sponsor this post, I just happen to use the brand most often)
I selected very small purple beads and two shades of purple and one shade of teal that were just a little bit bigger.

I started out by laying my beads out on my beadboard. You don't have to use a beadboard, it just helps to see it laid out. My pattern: 10 very small purple beads, 1 of each shade of the small purple, and a teal. I repeated it about 2-3 times around my board. I measured out my wire by wrapping it around my neck and making it a little longer than I wanted it to be when finished.
This is what it looked like near the end:

Once you've got the beads on to the length that you want your chain to be it's time for the tricky part. Finishing it.
I finished mine by looping the end of my string and sliding a crimp bead over it. Keep the loop big enough to fit your clasp. Crimp your bead with the pliers and your loop will stay in place. Do this with both sides.
Once you're done with that simply loosen the hooks on each side of your barrel clasp and connect each side to your loops. Pry them closed with your pliers the necklace portion is done!
It should look something like this:

To place my badge clip on I unhooked my clasp and slid it on.
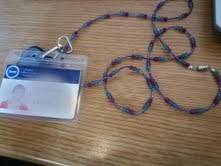
Finished product:
Nicole stepped slightly outside of her comfort zone to share the project, but she's no stranger to the internet world. Check out more of her writings on her tumblr teenagebookland.tumblr.com where she reviews and shares about her favorite books. Thanks so much Nicole!
Nicole stepped slightly outside of her comfort zone to share the project, but she's no stranger to the internet world. Check out more of her writings on her tumblr teenagebookland.tumblr.com where she reviews and shares about her favorite books. Thanks so much Nicole!
No comments:
Post a Comment
Hi there! Thanks so much for stopping by. Please feel free to leave a comment with your thoughts or subscribe using the buttons on the top right so we can get together again soon. Thanks friend!